Series editor
From PatioWiki
Contents |
Exercise type selection and initial configuration
Once you have selected the Others group, you have to select the Series exercise type at the Exercise type section.
In order to manually create the exercise you have to select the Manual option at the bottom of the panel. Next, the Initial options panel will appear in order to select the initial options for the new exercise:
- Exercise language.
- Sheet: Allows you to select the sheet for the new exercise. The sheet sets, among other things, how to distribute the images on the screen during the exercise execution.
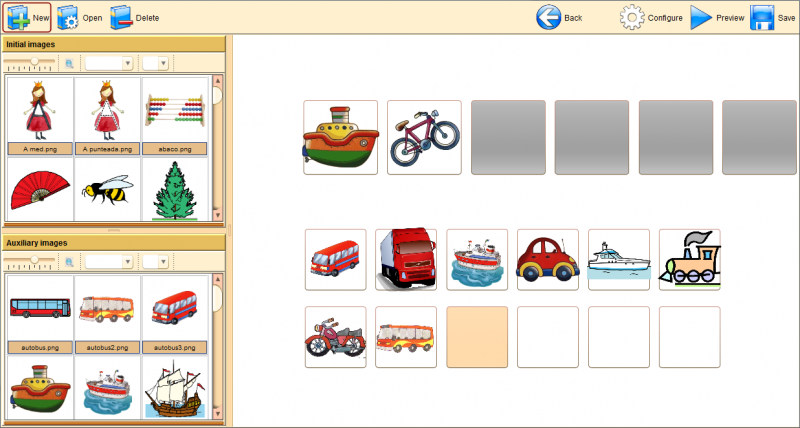
The next image shows the main panel of the Series manual editor.
Panels description
Initial images panel
The initial images are the ones that are displayed at the beginning of the exercise and they serve as a pattern for the student helping him to complete the series. The available images are shown in this panel and they can be added to the exercise. The top part of this panel allows you to filter the concepts (or topics) and the language of the image that you want to select. The lower panel will be showing the images that fulfill the conditions of the filters. If you press the "View details" button, additional information of the images will be shown.
Auxiliary images panel
The auxiliary images are the ones that depends on the topic of the selected initial images and that the pupil has to add to series in order to complete it. The images are selected in the same way used in the Initial images panel section.
Center panel
This panel contains the sheet of the exercise and the edition zone.
How to use it
Adding an initial image to the exercise
The initial images are the sticky images that are shown to the pupil at the beginning of the exercise as a pattern to follow for completing the series. These images have to be placed in the initial boxes which are the ones highlighted with an orange background in the center panel. The images that are highlighted with a gray background are not used for editing the exercise because they are the boxes where the pupil has to place the auxiliary images for completing the series.
- Select the image from the Initial images panel.
- Drag the image and drop it inside an initial box.
- If the image has more than one associated concept, a new window will appear in order to select the concept to work with.</li>
Note: Adding an initial image in a box that already contains another image will also remove the auxiliary images (described in the following section) of the replaced image.
Adding an auxiliary image to the exercise
The auxiliary images are the images that the student has to drop into the free boxes in order to resolve the series. The auxiliary images have to be placed inside the auxiliary boxes that are displayed with a white background in the center panel.
- Select the image from the Auxiliary images panel.
- Drag the image and drop it inside an auxiliary box located at the center panel. If there are any free boxes, the image have to be dropped inside the highlighted auxiliary box (depends on the selected sheet).
- If the image share concepts with more than one initial box, a new window will appear in order to select the concept to work with.
Note: The auxiliary images that appear in the Auxiliary images panel depend on the associated concepts of the initial images.
Swapping the position of two images or objects
Press the main button of the mouse over the image you want to move and, without releasing it, drag and drop it inside the desired box. The drop target have to have an associated image.
Note: The images to swap have to be of the same type (initial or auxiliary).
Removing a box image
- Press the right button of the mouse over the image you wish to remove.
- Select the Remove image option in order to finish.
Note 1: Removing an image could modify the position of the others images of the sheet. Note 2: Removing an initial image will remove the auxiliary images that share the same concept.
Removing all the images
- Press the right button of the mouse over any image of the exercise.
- Select the Remove all images option and confirm to finish.
Exercise configuration
To configure the exercise you have to press the Configure button located at the upper toolbar of PATIO.
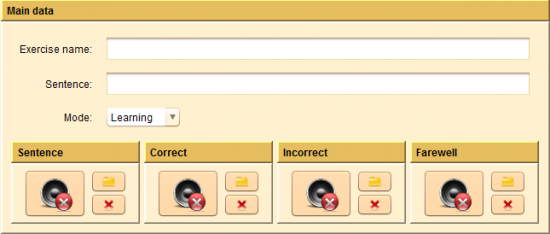
The next image shows the aspect of the exercise configuration panel.
This panel allows you to set the exercise general settings.
- Main data: Common data for all APRENDO exercises.
- Exercise name: A required field that sets the name of the exercise that is being edited.
- Sentence: Sets the sentence associated with the exercise.
- Mode: Sets the exercise mode: Evaluation or Learning.
- Sentence: This sound is played at the beginning of the exercise.
- Correct: This sound is played when the pupil clicks a correct pair.
- Incorrect: This sound is played when the pupil clicks an incorrect pair.
- Farewell: This sound is played at the end of the exercise.
The general sounds (Sentence, Correct, Incorrect and Farewell, are managed as it is described in the following link:
The following image shows the aspect of an edited exercise.
Preview and save the exercise
To read more about these functions you have to follow these links:


