Leo
From PatioWiki
LEO is a system that supports and reinforces teaching of reading and writing to preschool children aged 3 - 5 in a multicultural setting. It is based on the phonetic method of Letrilandia (Usero, 2004).
It allows a teacher to create different types of exercises (letters, syllables, words and phrases) quickly and easily. It has two working modes: learning mode and evaluation mode. In the former mode pupils learn in a group, while in the latter they are tested individually.
The system is equipped with a number of multimedia resources (audio, video, graphics, voice, drawings, blackboards, etc.) and can run in numerous technological media (computer, Tablet-PC or touch screen).
The system includes two main roles: teacher and pupil.
Teacher
The following diagram shows different actions that a teacher can perform.

Configure session options
A work session is characterized by the configuration of certain parameters such as class, mode and position of pupils. These parameters must be specified before starting the work session. If not, the system will refuse to work and display a message advising the user to configure the session.
To access the screen where you can configure session options, you should click on the toolbar above the menu Session.

After that a dialog box will be displayed where you can configure session options.
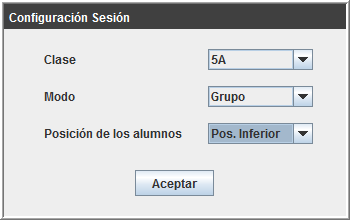
There are three options to choose from:
- Class: this option will indicate the particular class with which you will work (4A, 4B, 4C, 5A ...). When an exercise has been loaded, you will see a mosaic with photos of the pupils who belong to the selected class.
- Mode: this option allows you to select a mode or scenario. You can select between Single, Group, or All.
- Position of students: this parameter specifies the location of the mosaic with pupils' photos (top or bottom of the screen) which will be displayed during the exercises.
Create activities
To create an exercise you have to go to the menu Settings in the toolbar and click on the option Activities>> New activity.

Next, a new window will be shown where you specify the type of activity to be created.

After selecting a type of activity, a new window will be displayed where you can specify features of each type of activity. These windows are different from one another depending on the type of exercise you have chosen, however, they have several fields in common. Then, you will be provided with the description of the process of creating each of these exercises.
Crear Ejercicio Comprensión de Palabras
Crear Ejercicio Construye Palabras
Crear Ejercicio Emparejar Palabras
Crear Ejercicio Encadenar Palabras
Crear Ejercicio Escribir
Crear Ejercicio Escuchar
Crear Ejercicio Nube de Letras
Crear Ejercicio Ordenar Frase
Delete activities
Just like in the previous case, to delete an existing exercise, you should go to the Settings menu of the toolbar and click on the option Activities >> Delete activity.

Next, a new window will be shown where you can select the type of activity you wish to delete.
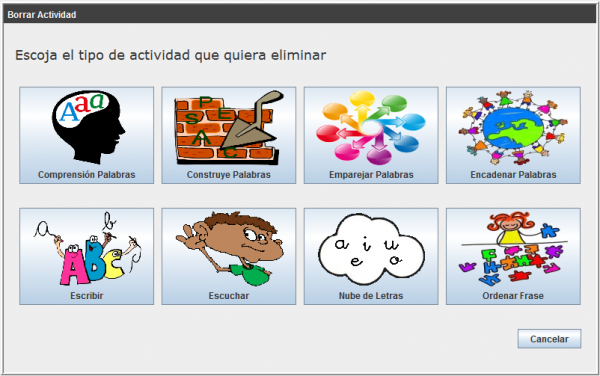
After selecting the desired type of exercise, a new window will be displayed. It will show all the exercises in the system which belong to the type of activity selected in the previous window.
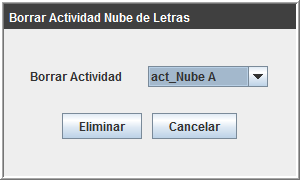
Once you have chosen the name of the exercise you want to delete, but before you click on the button Delete, there will appear several messages asking you to confirm the action you are about to perform.
Create evaluation session
An evaluation session is formed by a series of sets of predetermined exercises; such sets can be assigned to the selected pupils. The pupils will be asked to do them individually.
To create an evaluation session, you should go to the menu Settings in the toolbar and click on the option Session Evaluation >> New Session.

To create a evaluation session is necessary to perform the following two steps:
- Assign sets of exercises to the pupils that you want.
- Establish for each pupil, the order in which exercises of each group will be showing.
Assignment of exercises to pupils
The interface that the teacher has to perform this step is the following:
//Captura de la ventana del editor de sesiones de evaluacion//
The teacher should assign an identifying name to the session. He also needs to specify whether the session is active or not, that is, if you want that the session that you're creating is available for that the students perform it.
The window has two data filters through which the teacher can work more comfortably and handle only information that is useful:
- Class: The teacher should choose the class (4A, 4B ,..., 5C) with which he wants to work. By selecting one of them will be loaded a list with photo and name of pupils who belong to that class.
- Type of activity: the teacher can choose the types of activities with which he wants to work. By selecting the desired types will display a list of exercises belonging to the selected types available in LEO.
To make the assignment of exercises to pupils, only the teacher should click on the pupils of the list that he wants and then select which exercises that he wants pupils perform it. If the teacher wants to assign to a group of pupils the same set of exercises will not have to make an assignment for each pupils, but can simply make the assignment once because the system can assign exercises both to a single pupil as to a selected group.
The window also has several points of information, through which summarizes the assignments that have been made:
- Pupil information: next to each pupil of the list there is a button that when is pressed will display a screen with a summary of the exercises that have been assigned to that pupil.
- Exercise information: next to each exercise of the list there is a button that when is pressed displays a window that lists all the pupils who has been assigned this exercise.
//captura venetana información alumno// //captura venetana información ejercicio//
Finally, in the bottom of the screen there are three control buttons:
- Sequence Button: When you click on this button will go to the 2nd step of creating of an evaluation session. Make sequencing is optional. If not done, the exercises will take the default order that corresponds to the order in which they are assigned to pupils.
- Accept Button: clicking this button, the system stores the session that being created. If in this window, you click on this button, you accept the default order of the exercises.
- Cancel Button: Pressing this button cancels the creation of the evaluation session.
Establish order in the exercises
This step in the creation of an evaluation session is optional. If not done, the exercises will take the default order that corresponds to the order in which they are assigned to pupils.
The teacher has the following window to order the exercises:
//Captura del secuenciador de ejercicios//
As can be seen, on the left side of the screen displayed only the pupils who have been assigned some exercise. Clicking on any of them, loaded in the right side of the screen a list with the assigned exercises to that pupil. The shown exercises have the default order. By the arrows shown on the right margin of the screen you can specify the desired order of the exercises.
Finally, in the bottom of the screen there are two control buttons:
- Accept Button: clicking this button, the system will save the session that is being created with the sequences of exercises that has been specified.
- Cancel Button: Pressing this button cancels the creation of the evaluation session.
Delete evaluation session
To delete an existing evaluation session must go to the menu Settings in the toolbar and click on the option Session Evaluation >> Session Delete.

Next, a new window will be displayed with all the evaluation sessions stored in the system.
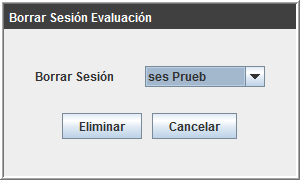
When you have selected the name of the evaluation session you want to delete, there will appear several messages asking you to confirm the action you are about to perform.
Select work mode
To select the mode you want to work with, you should go to the menu Work Mode in the toolbar and choose one of two available modes in the system.

These two modes are Learning Mode and Evaluation Mode which differ in the way the exercises are presented to pupils and work scenarios they bring about.
- Learning mode: this mode allows all pupils from one class to perform the exercises jointly, i.e. a pupil does an exercise in the presence of his/her classmates. Thus all pupils learn at the same time, even though only one pupil does the exercise. To implement this learning mode it is necessary to use a Smart Board, as shown in the image on the left.
- Evaluation mode: it is used to test the knowledge that a pupil has acquired during learning sessions. The ideal work scenario for this mode is where the pupil does the exercises alone, without the presence of any classmates. A Tablet-PC should be used as support, as shown in the image on the right.
Learning mode
When selecting a learning mode, a new window will be shown where you will choose the group of activities with which you want to work. The groups are distinguished by the linguistic units they deal with (letters, letters-words, syllables-words, words, words-sentences).
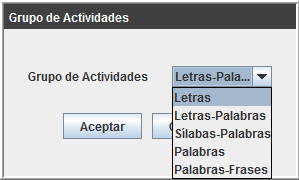
Depending on the choice you have made, the system will offer the possibility of practicing with certain types of activity. The following summary shows available types of activity depending on the selected option.

Evaluation mode
When selecting this mode, you must navigate through different screens:
- Start.
- Login.
- Sessions.
- Viewer exercises.
Start screen
This is the first screen that appears after selecting the evaluation mode and looks like this:
// Captura pantalla Incio modo evaluacion //
Using this screen, you can select the class (4A, 4B...5C) with which you work. Once chosen, click on the Accept button to go to the login screen. If you click on Cancel will leave the evaluation mode.
This screen will appear again when a pupil finished making your evaluation session.
Login screen
Through this screen, you can select the student with which you want to perform the evaluation session. The appearance of this screen is:
// Captura pantalla Identificación modo evaluacion //
As can be seen in the image, it shows the photo of each pupil of the selected class in the start screen. These photos may appear of two different ways:
- In colour: it will mean that these pupils have at least one allocated evaluation session. Clicking on any of them, automatically pass to the next screen (screen session).
- Black and white: this means that such pupils haven't got assigned any evaluation session. Clicking on any of them, the system gives the opportunity to create at that time an evaluation session and assign it to the selected pupil.
Screen of sessions
The appearance shown in this screen is as follows:
//Captura pantalla sesiones//
This screen shows a list of all sessions that were assigned to the selected pupils in the previous screen. These sessions appear ordered by date of creation, newest to oldest. Note also that there is a color code to distinguish at a glance the different states in which a session can be.
- Green: the green colour means that the pupil hasn’t yet realized any of the exercises that constitute the session.
- Orange: the orange colour means that the pupil has made some of the exercises that contains the evaluation session, but it hasn't been finished completely. If you select a session in this state, the pupil will continue for the first exercise of the session that has not yet done.
- Gray: the gray colour means that the pupil has completed all the exercises that make up the session. The start of these sessions is disabled.
- Red: the red colour means that the session isn't active, that is, it isn't available to be done by any pupil.
You can choose which is the evaluation session that you want that the pupil does, simply clicking on the arrow next to each session. Pressing, automatically pass to the next screen, the viewer exercises.
Viewer exercises
The viewer of exercise is going to be responsible for presenting the pupil each exercise of the selected evaluation session. Here is an example that shows how the viewer shows the exercise in evaluation mode:
//Captura visor de ejercicios//
After completion of each exercise, the arrow in the lower right corner of the screen is enabled. Clicking on this arrow will be loaded the following exercise that the pupil must perform.
After completion all exercises of the evaluation session, you return to the start screen.
Pupil
The following diagram shows the actions that a pupil can perform in the system.

Do exercises
In this section, we will describe the main components of different types of activities and the purpose of each of them. Depending on the working mode (Learning or Evaluation) in which exercises are performed, the appearance of the interface may vary slightly (some elements disappear). The exercises are described for the learning mode since in this mode each exercise is displayed in its entirety.


